
Let’s be real – we’re all drowning in digital photos while our walls stay depressingly blank. You’ve got thousands of fire pics rotting away in your camera roll, but somehow your room still looks like a sad college dorm. Time to change that! Whether you’re trying to flex your aesthetic or just want to make your space feel more “you,” these creative photo display ideas will transform your boring walls into a whole vibe. No more excuses about not knowing where to start – we’re about to serve you some serious inspiration that’ll have your friends asking “who’s your interior designer?”
Why Photo Displays Matter More Than You Think {#why-photo-displays-matter}
Photo displays aren’t just about showing off your best selfies (though that’s totally valid too). They’re about creating a space that tells your story, showcases your personality, and makes your house feel like a home. Research shows that personalizing our living spaces with meaningful images significantly impacts our mood and overall well-being.
The Psychology Behind Photo Displays
When you surround yourself with positive memories and beautiful imagery, you’re essentially creating visual anchors for happiness. Family photos, travel memories, and artistic shots all contribute to a sense of belonging and identity within your space. Interior designers consistently rank personalized photo displays as one of the most effective ways to make a house feel like home.
Current Trends in Photo Display
The photo display landscape has evolved dramatically beyond traditional frames on mantelpieces. Modern homeowners are embracing gallery walls, mixed media displays, and innovative hanging systems that treat photographs as serious art pieces. The key is balancing trendy display methods with timeless appeal.
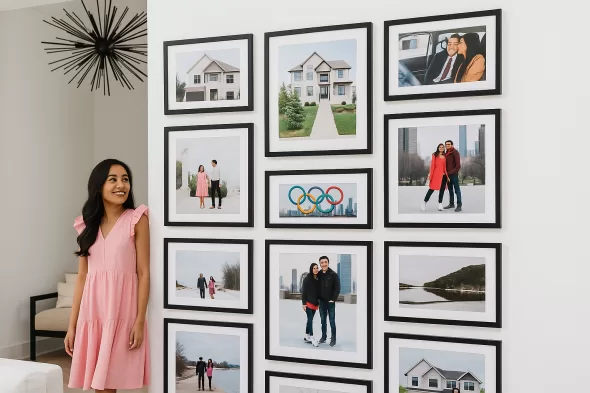
Gallery Wall Magic: The Ultimate Guide {#gallery-wall-guide}
Gallery walls are having a major moment, and for good reason. They’re versatile, impactful, and can work in any space from tiny apartments to sprawling homes. Here’s how to create gallery walls that actually work.
Planning Your Gallery Wall Layout
Before you start hammering nails into your wall, proper planning is essential. The most successful gallery walls feel intentional, not random. Start by laying out your frames on the floor to experiment with different arrangements.
The Grid Method: Perfect for those who love clean, organized aesthetics. This involves arranging photos in a structured grid pattern with equal spacing between frames. Works best with photos of similar sizes and matching frames.
The Salon Style: This maximalist approach involves covering the wall with artwork of various sizes, creating a rich, layered look. Popular in European homes, this style allows for mixing different frame styles, sizes, and even incorporating other wall decor like mirrors or small shelves.
The Organic Method: A more relaxed approach that feels naturally curated. Start with one central piece and build outward, maintaining visual balance through color, size, and spacing.
Frame Selection and Coordination
Your frame choices can make or break your gallery wall. While matching frames create a cohesive, polished look, mixing frame styles can add visual interest and personality.
Coordinated Color Schemes: Stick to 2-3 frame colors maximum. Popular combinations include black and white, natural wood tones, or metallics like gold and silver.
Size Variation: Include a mix of frame sizes to create visual rhythm. A good rule of thumb is to include at least three different sizes, with your largest pieces serving as anchor points.
Matting Considerations: White or cream matting creates a classic, gallery-like appearance and helps unify photos of different sizes. For a more modern look, consider colored mats that complement your room’s color scheme.
Spacing and Hanging Guidelines
Proper spacing is crucial for a professional-looking gallery wall. The sweet spot for spacing between frames is typically 2-3 inches, though this can vary based on your overall wall size and design preference.
Eye Level Rules: The center of your gallery wall should be at eye level, typically around 57-60 inches from the floor. For larger walls, you might center the arrangement slightly higher.
Template Technique: Create paper templates of each frame and tape them to the wall before hanging. This allows you to perfect your layout without creating unnecessary holes in your wall.
Gallery Wall Themes and Concepts
Travel Memory Walls: Showcase your adventures with a mix of landscape shots, candid travel moments, and cultural photography. Include maps, postcards, or ticket stubs for added texture.
Family Heritage Displays: Combine current family photos with vintage family portraits, creating a timeline that celebrates your family’s history.
Artistic Photography Collections: Curate a collection of fine art photography or your own artistic shots, treating your wall like a personal gallery space.
Color Story Walls: Organize photos by color palette, creating a cohesive visual story that complements your room’s decor.
Creative Hanging Methods {#creative-hanging-methods}
Traditional picture hanging is just the beginning. Modern photo displays embrace innovative hanging methods that add dimension and interest to your walls.
Wire and Clip Systems
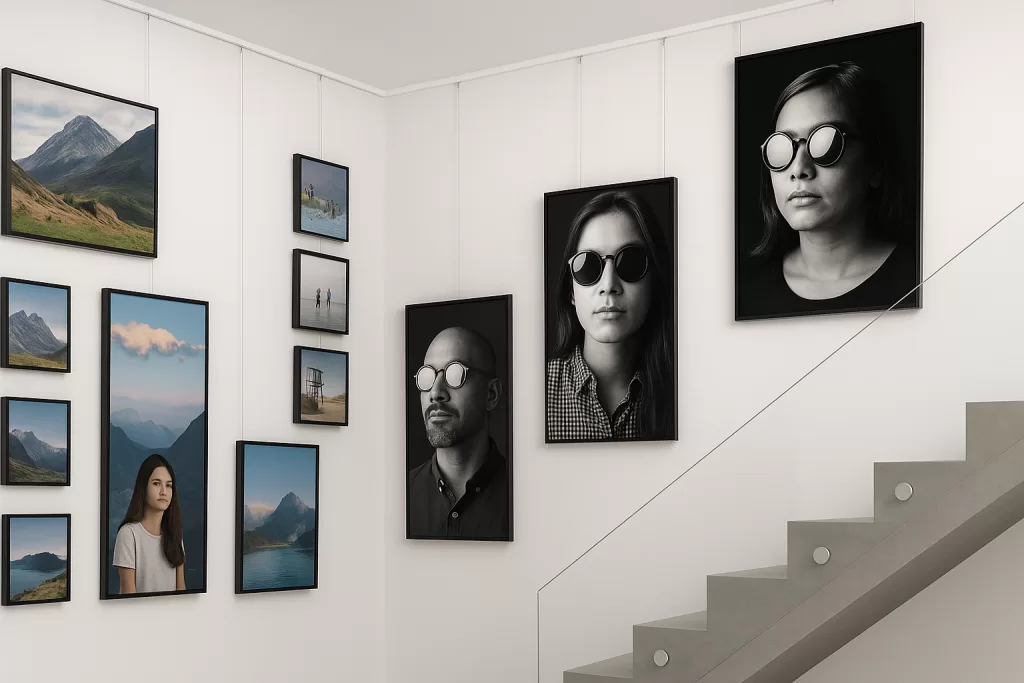
Photo wire systems offer flexibility and easy rotation of displayed images. Install horizontal wires across your wall and use decorative clips to attach photos. This method is perfect for frequently changing displays and works especially well in creative spaces like home offices or studios.
Installation Tips: Use picture hanging wire rated for the weight you plan to display. Secure wire endpoints with heavy-duty wall anchors, and maintain slight tension to prevent sagging.
Styling Options: Mix photo sizes and orientations along your wire display. Layer photos for depth, and consider adding small plants or decorative objects to your clips for added visual interest.
Floating and Ledge Displays
Picture ledges and floating shelves create dynamic displays that allow for easy rearranging. This method works particularly well for renters who want to avoid multiple wall holes.
Ledge Styling: Layer frames of different sizes, mixing vertical and horizontal orientations. Add small decorative objects like candles, plants, or books to create visual interest between photo groupings.
Multiple Ledge Arrangements: Install ledges at different heights to create a gallery wall effect without individual frame hanging. This approach works beautifully in hallways, stairwells, and long walls.
Magnetic and Clip Boards
For a more casual, changeable display, consider magnetic boards or large clipboards. These options are perfect for displaying photos alongside other memorabilia like tickets, postcards, or artwork.
Magnetic Board Options: Large metal sheets, magnetic paint, or decorative magnetic boards all serve as excellent bases for rotating photo displays.
Clip Board Arrangements: Oversized clipboards or bulletin boards covered in attractive fabric create organized display spaces perfect for mood boards or inspiration collections.
String and Clothesline Displays
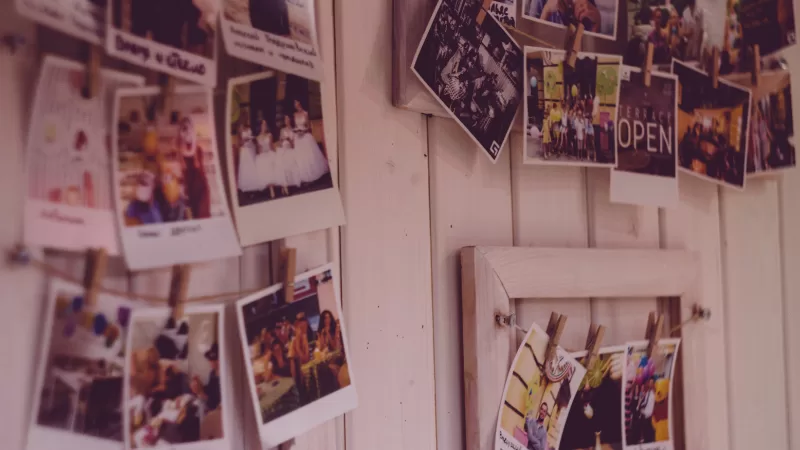
Embrace a rustic or bohemian aesthetic with string displays. Use twine, rope, or decorative string to create horizontal lines across your wall, then clip photos using miniature clothespins or decorative clips.
Styling Variations: Create single lines for minimalist appeal, or multiple crisscrossing lines for a more complex display. Consider using different string materials like hemp, copper wire, or fairy light strings for varied aesthetics.
DIY Photo Display Projects {#diy-projects}
Creating your own photo display solutions allows for complete customization while often saving money compared to purchased alternatives.
Handmade Frame Projects
Reclaimed Wood Frames: Create rustic frames using reclaimed wood or driftwood. Sand pieces smooth, then construct simple rectangular frames using wood glue and corner brackets. These frames work beautifully for nature photography or casual family shots.
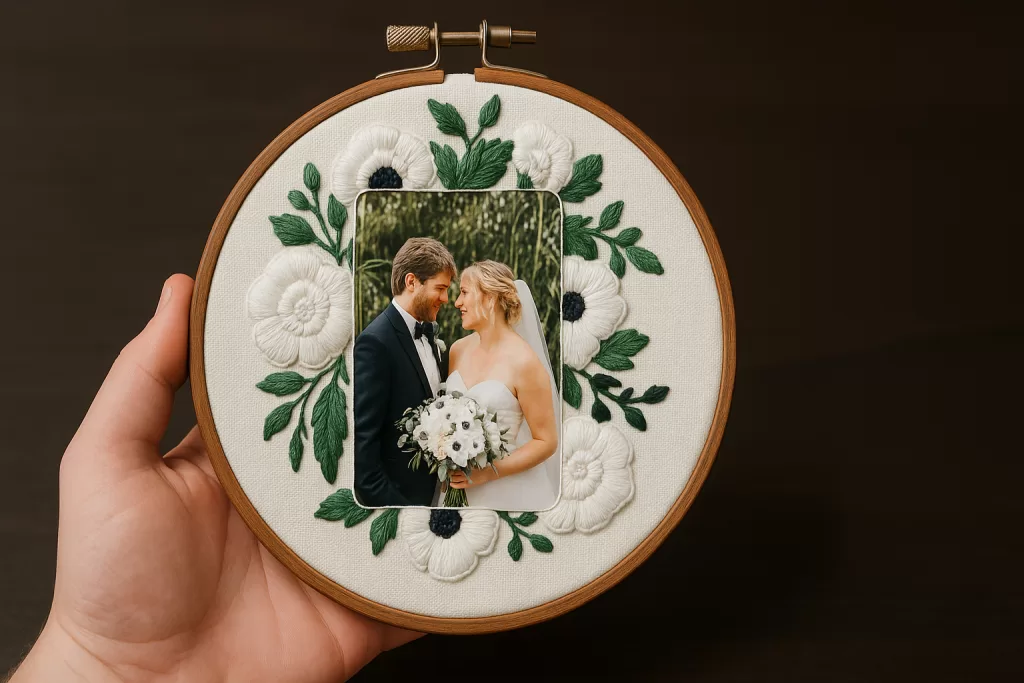
Embroidery Hoop Displays: Large embroidery hoops make unique circular frames. Stretch fabric over the hoop, then attach photos using double-sided tape or small clips. This technique works especially well for bohemian or craft room aesthetics.
Washi Tape Frames: For a temporary, renter-friendly option, create colorful frames directly on your wall using washi tape. This method allows for easy changes and works particularly well in children’s rooms or temporary spaces.
Shadow Box and Dimensional Displays
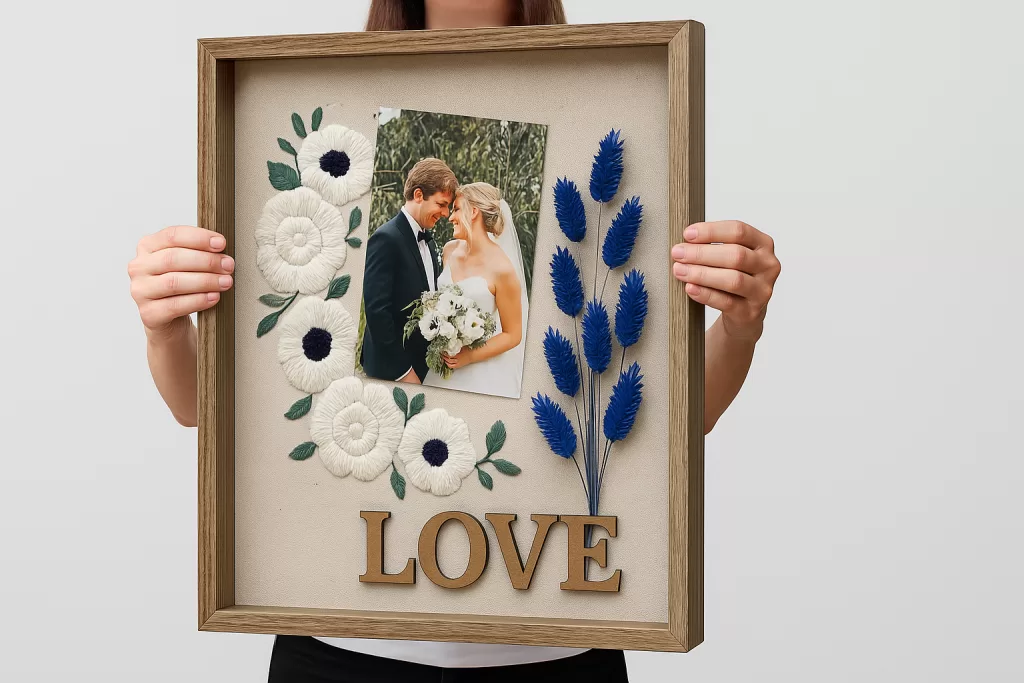
Shadow boxes add depth and allow for three-dimensional photo displays. Create themed shadow boxes combining photos with related objects, tickets, or memorabilia.
Travel Shadow Boxes: Combine destination photos with maps, currency, small souvenirs, and travel documents to create comprehensive travel memories.
Milestone Shadow Boxes: Document important life events by combining photos with related items like graduation caps, wedding invitations, or baby items.
Rope and Macrame Displays
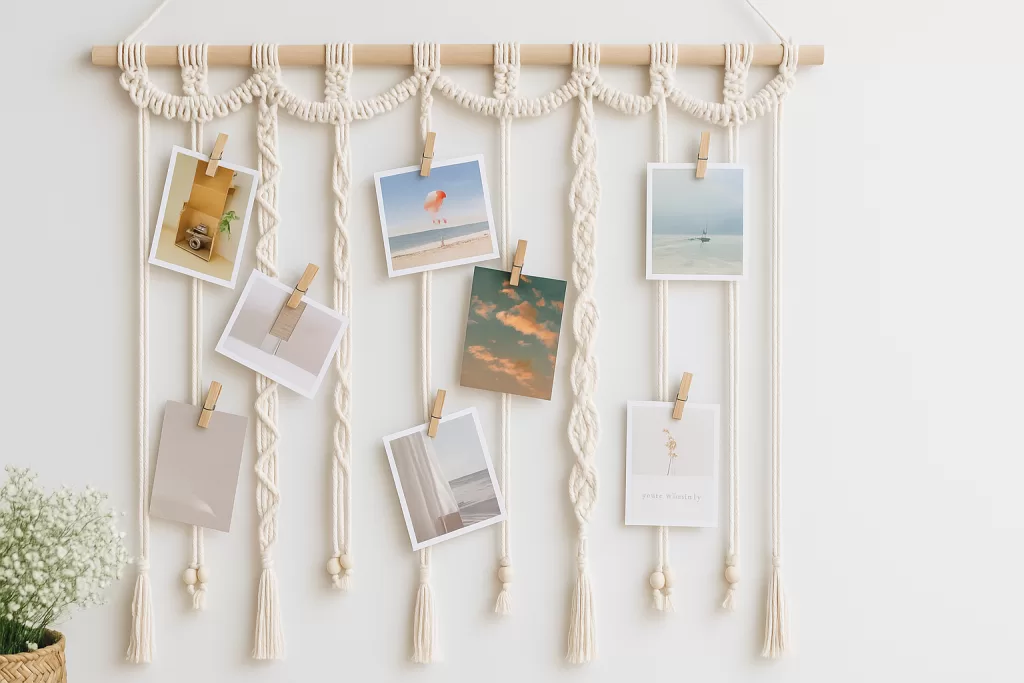
Macrame photo hangers add bohemian charm while showcasing your favorite images. Create simple or complex macrame designs that hold single photos or multiple images in cascading arrangements.
Basic Macrame Hanger: Use cotton rope to create simple diamond or square patterns that hold single frames. These work beautifully in groups or as standalone statement pieces.
Complex Hanging Gardens: Combine macrame techniques with small planters and photo displays to create living wall art that incorporates both natural elements and personal memories.
Vintage and Upcycled Solutions
Transform vintage items into unique photo displays. Old windows, doors, ladders, and furniture pieces can become conversation-worthy photo display solutions.
Vintage Window Frames: Remove glass from old window frames and use the panes to hold different photos. This creates a cohesive display with built-in organization.
Ladder Displays: Vintage or new ladders can be leaned against walls or hung horizontally to create rustic photo display opportunities. Attach photos using clips or small shelves between rungs.
Suitcase Displays: Open vintage suitcases can be mounted to walls to create unique shadow box displays perfect for travel photos and memorabilia.
Digital and Modern Solutions {#digital-solutions}
Technology has revolutionized photo displays, offering dynamic alternatives to traditional static arrangements.
Digital Photo Frames
Modern digital frames have evolved far beyond the pixelated displays of the past. Current options offer high-resolution displays, Wi-Fi connectivity, and smartphone integration.
Smart Frame Features: Look for frames offering automatic photo rotation, remote updating capabilities, weather displays, and integration with social media platforms. Many modern options allow family members to email photos directly to the frame.
Placement Considerations: Digital frames work best in areas with controlled lighting to avoid glare. Consider kitchen counters, bedside tables, or office desks as optimal locations.
Projection Displays
Photo projectors create large-scale, changeable displays perfect for special occasions or regular rotation of large photo collections.
Projection Options: Portable projectors can display photos on walls, ceilings, or even outdoor surfaces for parties and gatherings. Some models offer battery operation for complete portability.
Creative Applications: Use projections for temporary gallery walls during parties, outdoor movie nights with personal photos as pre-show entertainment, or rotating bedroom ceiling displays.
Interactive Digital Walls
For tech-savvy homes, interactive digital walls allow for touch-controlled photo browsing and display. While requiring more significant investment, these solutions offer unlimited display possibilities.
Installation Considerations: Interactive walls require professional installation and careful planning for optimal viewing angles and user interaction zones.
Room-by-Room Display Ideas {#room-by-room}
Different rooms call for different photo display approaches based on function, traffic patterns, and design aesthetics.
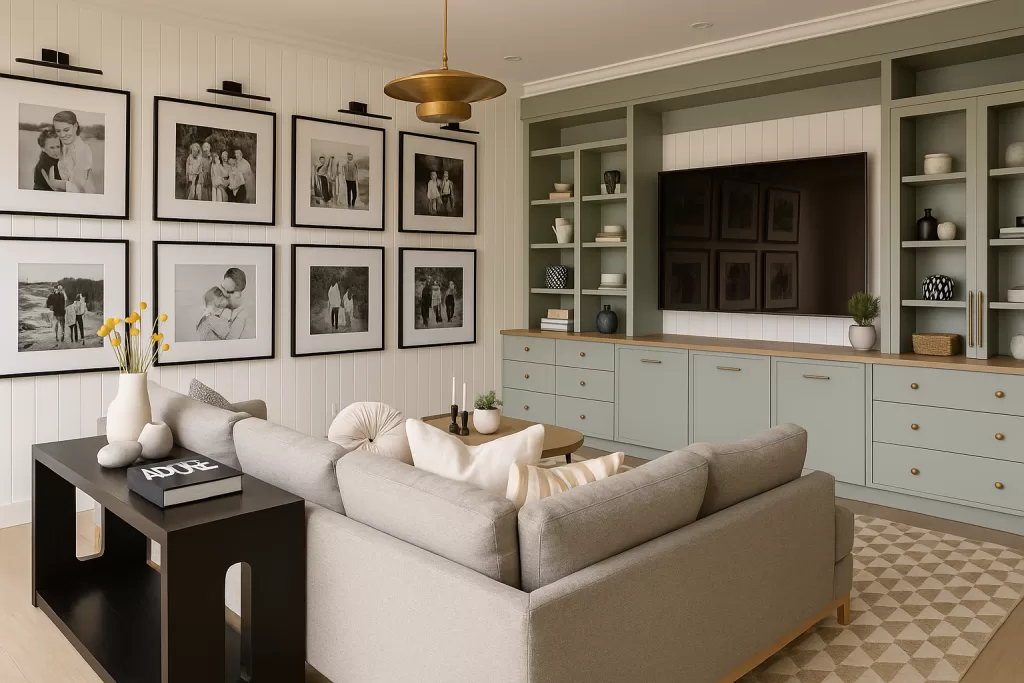
Living Room Gallery Displays
Living rooms offer prime real estate for impressive photo displays. This space typically accommodates larger gallery walls and statement pieces.
Above Sofa Arrangements: The wall above your sofa is perfect for gallery walls or large statement pieces. Ensure your display is proportional to your furniture – a good rule is that artwork should be 2/3 the width of your sofa.
Console Table Displays: Side tables and console tables provide opportunities for layered photo arrangements combining framed photos with decorative objects.
Corner Gallery Nooks: Transform unused corners into intimate gallery spaces with small chairs or plants surrounded by thoughtfully arranged photo displays.
Bedroom Photo Sanctuaries
Bedrooms benefit from more personal, intimate photo displays that reflect your closest relationships and most meaningful memories.
Headboard Gallery Walls: Create a dramatic focal point with gallery walls above your bed. Keep arrangements balanced and avoid hanging pieces that could fall during earthquakes or accidents.
Dresser and Nightstand Arrangements: Use these surfaces for smaller, more intimate photo arrangements featuring family, partners, or personal achievements.
Closet Door Displays: Often overlooked, the inside of closet doors provides perfect spaces for inspiration boards or personal photo collections.
Kitchen Memory Walls
Kitchens, as gathering spaces, work well for family-focused photo displays that celebrate shared meals and memories.
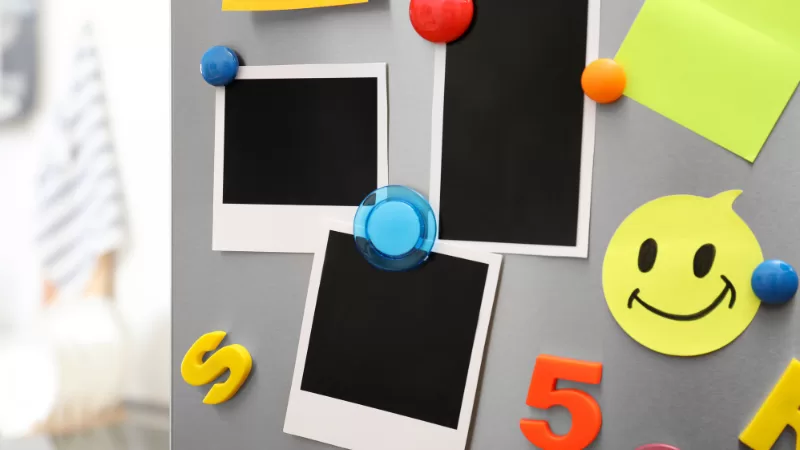
Refrigerator Gallery Alternatives: Move beyond basic refrigerator magnet displays with dedicated photo walls or magnetic boards designed specifically for kitchen photo rotation.
Open Shelving Integration: If your kitchen features open shelving, integrate small framed photos among dishes and decorative objects for a lived-in, personal touch.
Breakfast Nook Collections: Cozy eating areas benefit from warm, family-focused photo arrangements that make meal times more personal and inviting.
Hallway and Stairway Galleries
Hallways and stairways offer unique opportunities for linear photo storytelling and family timeline displays.
Stairway Progressions: Arrange photos chronologically as they ascend stairs, creating visual narratives of family growth, travel adventures, or personal achievements.
Hallway Timelines: Long hallways accommodate extended photo timelines or thematic collections that visitors can enjoy while moving through your home.
Entry Area Welcome Displays: Create welcoming first impressions with photo displays that introduce your family or showcase your interests immediately upon entering your home.
Bathroom and Powder Room Surprises
Often overlooked, bathrooms provide opportunities for unexpected photo displays that delight guests and family members.
Powder Room Gallery Walls: Guest bathrooms are perfect for playful or artistic photo displays that give visitors something interesting to observe.
Bathroom Mirror Surrounds: Frame bathroom mirrors with small photo arrangements or use magnetic frames that can attach directly to mirror edges.
Home Office Inspiration Walls
Home offices benefit from photo displays that inspire productivity while maintaining personal connection.
Motivation and Achievement Displays: Showcase personal accomplishments, inspirational quotes paired with meaningful photos, or goal visualization boards.
Client-Facing Backgrounds: For video conferencing, create professional yet personal backgrounds featuring tasteful photo arrangements that reflect your personality.
Children’s Room Creative Displays
Kids’ rooms offer opportunities for playful, colorful photo displays that can grow and change with children.
Growth Timeline Walls: Document children’s growth with yearly photos arranged chronologically, creating visual growth charts that celebrate development.
Artwork Integration: Combine children’s artwork with family photos to create comprehensive displays celebrating creativity and family bonds.
Interactive Photo Activities: Use magnetic or clip systems that allow children to participate in arranging and rearranging their photo displays.
Budget-Friendly Options {#budget-friendly}
Creating stunning photo displays doesn’t require expensive materials or professional installation. These budget-conscious approaches deliver maximum impact with minimal investment.
Thrift Store and Flea Market Finds
Second-hand stores offer treasure troves of unique frames, vintage items, and display materials at fraction of retail costs.
Frame Hunting Strategies: Look for frames with interesting shapes, textures, or materials. Don’t worry about existing artwork – focus on frame quality and potential. Mismatched frames can be unified with spray paint or coordinating mats.
Vintage Item Repurposing: Old windows, doors, shutters, and furniture pieces can become unique photo display solutions. Look for items with interesting architectural details or weathered finishes that add character.
Bulk Buying Benefits: Purchase multiple similar frames when you find good deals, even if you don’t need them immediately. Having coordinated frames available allows for future display expansion.
Dollar Store Display Solutions
Dollar stores offer surprisingly effective photo display materials when used creatively.
Basic Frame Upgrades: Purchase simple frames and upgrade them with paint, decorative paper, or fabric coverings to create custom looks.
Display Hardware: Find clips, strings, small easels, and magnetic materials that can create interesting display methods for minimal cost.
Decorative Accents: Use dollar store items like artificial flowers, ribbons, or decorative papers to enhance basic photo displays.
Free and Natural Materials
Nature provides beautiful, free materials perfect for rustic or bohemian photo displays.
Driftwood and Branch Frames: Collect interesting wood pieces from beaches, forests, or your own yard to create unique frame materials. Sand smooth and seal for indoor use.
Stone and Shell Accents: Beach stones, interesting rocks, and shells can become decorative elements in shadow box displays or frame embellishments.
Dried Flower and Plant Integration: Pressed flowers, dried grasses, and autumn leaves can be incorporated into photo displays for natural, seasonal appeal.
DIY Frame Construction
Building your own frames allows for complete customization while saving significant money compared to custom framing services.
Basic Wood Frame Construction: Purchase wood molding from hardware stores and create simple rectangular frames using miter cuts and wood glue. This approach costs significantly less than purchasing equivalent frames retail.
Alternative Frame Materials: Consider using PVC pipe, rope, or even cardboard to create unique frame shapes and styles that would be expensive to purchase commercially.
Group Construction Projects: Organize frame-making sessions with friends or family to share materials and tools while creating coordinated display elements.
Printable and Digital Resources
The internet offers numerous free resources for creating professional-looking photo displays.
Free Printable Mats and Borders: Download decorative borders, mat designs, and frame templates that can be printed at home and used to enhance basic photo displays.
Design Software Utilization: Use free design programs to create custom photo collages, timeline displays, or themed arrangements before printing.
Online Printing Services: Take advantage of frequent sales and promotions from online printing services to get high-quality prints for significantly less than local printing costs.
Professional Tips and Tricks {#pro-tips}
Learn from interior design professionals to create photo displays that rival expensive decorator installations.
Lighting Considerations
Proper lighting can make or break your photo display effectiveness. Understanding how light interacts with your photos and frames is crucial for optimal presentation.
Natural Light Management: Position photo displays to take advantage of natural light while avoiding direct sunlight that can fade photos over time. North-facing walls typically offer the most consistent natural lighting throughout the day.
Artificial Lighting Enhancement: Install picture lights or track lighting to highlight important photo displays. LED strip lights behind floating shelves create dramatic backlighting effects.
Glare Prevention: Avoid hanging glossy framed photos directly across from windows or bright light sources. Use anti-glare glass or acrylic for pieces that can’t be repositioned.
Color Theory Application
Understanding color theory helps create photo displays that enhance rather than compete with your existing decor.
Complementary Color Schemes: Choose photos and frames that complement your room’s existing color palette. This doesn’t mean everything must match, but colors should work harmoniously together.
Monochromatic Displays: Black and white photo collections create sophisticated, timeless displays that work in any decor style. Consider converting color photos to black and white for cohesive gallery walls.
Pop of Color Strategy: Use colorful photos strategically as accent pieces against neutral backgrounds, or neutral photos to calm busy, colorful rooms.
Proportion and Scale Guidelines
Professional designers follow specific guidelines for proportional relationships between photo displays and surrounding elements.
Furniture Relationship Rules: Photo displays should relate proportionally to nearby furniture. Large sofas can handle substantial gallery walls, while delicate side tables call for smaller, more intimate arrangements.
Ceiling Height Considerations: In rooms with high ceilings, extend photo displays higher on walls to maintain visual balance. Low ceilings benefit from horizontal arrangements that emphasize width over height.
Visual Weight Distribution: Balance heavy visual elements (large dark frames) with lighter elements (small light frames) to create displays that feel stable and intentional.
Maintenance and Preservation
Protecting your photo displays ensures they remain beautiful and meaningful for years to come.
Dust Prevention Strategies: Regular dusting prevents buildup that can damage frames and obscure photos. Use microfiber cloths and avoid harsh chemicals that might damage frame finishes.
UV Protection Measures: Invest in UV-filtering glass or acrylic for valuable or irreplaceable photos. This is especially important for vintage family photos or original artwork.
Rotation Scheduling: Plan regular display rotations to prevent photo fading and keep displays fresh and interesting. Digital calendars can remind you to update seasonal displays or rotate family photos.
Professional Installation Techniques
Learn techniques that professional installers use to ensure secure, level, and attractive photo hanging.
Wall Stud Location: Use electronic stud finders to locate wall studs for secure hanging of heavy pieces. Mark stud locations lightly with pencil for future reference.
Level Installation Methods: Invest in a quality level and use it consistently. For gallery walls, establish a level baseline and measure consistently from that reference point.
Hardware Selection: Choose appropriate hanging hardware based on wall type and frame weight. Drywall requires different anchors than plaster or concrete walls.
Technology Integration
Modern photo displays can incorporate technology for enhanced functionality and visual impact.
Smart Home Integration: Connect digital frames to smart home systems for automatic updating based on schedules, weather, or family calendar events.
Backup and Archiving: Maintain digital backups of all displayed photos. Cloud storage ensures precious memories remain safe even if physical prints are damaged.
QR Code Enhancement: Add QR codes to photo displays that link to additional photos, videos, or stories related to displayed images. This creates interactive experiences for family and guests.
Advanced Creative Techniques
Push beyond basic photo displays with advanced techniques that create truly unique and memorable presentations.
Mixed Media Integration
Combine photographs with other art forms to create rich, layered displays that tell complete stories.
Textile Integration: Incorporate fabric elements like vintage quilts, tapestries, or embroidered pieces alongside related photos for textural interest and cultural storytelling.
Three-Dimensional Elements: Add depth to photo displays with small sculptures, dried flowers, or meaningful objects that relate to photo subjects or themes.
Written Elements: Include handwritten letters, vintage postcards, or calligraphy elements that provide context and emotional depth to photographic memories.
Seasonal and Rotating Displays
Create displays that change throughout the year, keeping your home feeling fresh and responsive to seasons and life changes.
Seasonal Color Palettes: Rotate photos based on seasonal color schemes – warm autumn tones, cool winter blues, fresh spring greens, and bright summer colors.
Holiday Integration: Design displays that can easily incorporate holiday elements without complete rearrangement. Use neutral base arrangements that accept seasonal additions.
Life Stage Adaptations: Plan displays that can grow and change with life stages – wedding photos, new babies, children’s achievements, and family milestones.
Artistic Photography Curation
Treat your home like a personal gallery by curating photography collections with artistic intent and professional presentation standards.
Thematic Collections: Develop coherent themes like architectural photography, nature studies, or portrait series that demonstrate artistic vision and curation skills.
Print Quality Investment: Invest in high-quality printing for your best photographs. Professional printing services offer archival papers and inks that ensure longevity and color accuracy.
Gallery-Style Presentation: Use museum-quality matting and framing techniques for your most important pieces. This elevates personal photography to art-worthy status.
Troubleshooting Common Display Problems
Address frequent issues that arise with photo displays and learn professional solutions.
Hanging and Stability Issues
Crooked Pictures: Install small adhesive furniture pads on frame backs to prevent sliding and maintain level positioning.
Heavy Frame Solutions: Use appropriate wall anchors rated for your frame weight. When in doubt, locate wall studs for maximum support.
Gallery Wall Alignment: Create paper templates and use laser levels or smartphone apps to ensure perfect alignment across multiple pieces.
Visual Balance Problems
Overwhelming Displays: If your gallery wall feels chaotic, try removing 20% of the pieces and reassessing. Sometimes less creates more impact.
Sparse Arrangements: Add visual weight with larger pieces, darker frames, or additional elements like plants or decorative objects.
Color Clash Resolution: Introduce unifying elements like matching mats, coordinated frames, or a consistent color thread throughout the display.
Maintenance and Longevity
Fading Prevention: Rotate photos regularly and use UV-filtering glass in areas with significant light exposure.
Frame Damage Repair: Learn basic frame repair techniques for minor damage, or establish relationships with local frame shops for professional restoration.
Updated Photo Integration: Plan display systems that allow for easy addition of new photos without complete rearrangement.
Conclusion: Creating Your Personal Photo Gallery
The key to successful photo displays lies in balancing personal meaning with visual appeal, technical execution with creative expression. Your photo displays should reflect your unique story while contributing to your home’s overall aesthetic and emotional atmosphere.
Start small with one wall or room, experiment with different techniques, and gradually develop your personal style. Remember that the best photo displays evolve over time, growing and changing with your life experiences and aesthetic preferences.
Whether you choose minimalist gallery walls, eclectic mixed-media displays, or technology-integrated solutions, the most important element is that your photo displays bring you joy and help tell your unique story. Your walls should celebrate your life, relationships, and experiences in ways that feel authentic and meaningful to you.
The investment in thoughtful photo displays pays dividends in daily happiness, improved home atmosphere, and the preservation of precious memories for future generations. Take the time to plan, invest in quality materials when possible, and most importantly, enjoy the process of creating spaces that truly reflect who you are and what matters most to you.
With these comprehensive ideas, techniques, and professional insights, you’re equipped to transform any space into a personalized gallery that celebrates your life and enhances your daily living experience. Start planning your photo display project today, and begin creating walls that tell your story in beautiful, meaningful ways.
Check out few images with Creative Photo Display Ideas
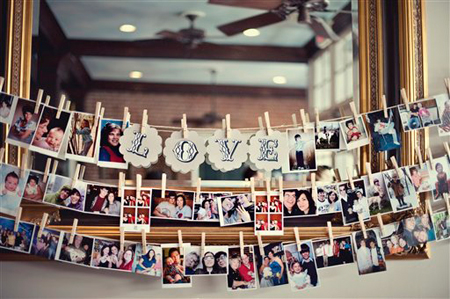
Make a garland of your memories, simple yet elegant way to clip these photographs together. You can put them on mantle or a window, as you find them best. Link
How about your personal gallery? Experiment with frames, different photograph size. Link

If you love travelling, this one length portrait would be a definite inspiration for anyone walking into your crib. Link

Key to beautiful clicks is natural tone to them and black and white pictures add a zest to the display area.

Found on Southern Living, this hanging picture idea adds life to the living room. You can make good use of the empty corners.

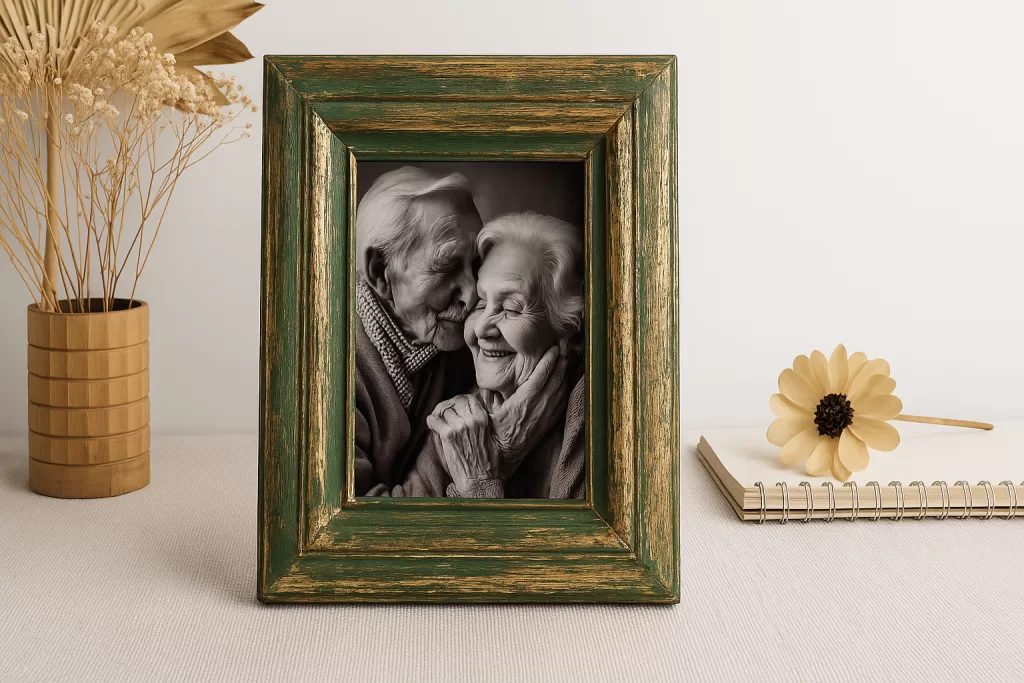
Colored background frame and black & white pictures is a fabulous idea to put together. Link

Tree clay design on the wall and pictures displayed on the branches, now that is what I call a Family Tree. Link

Photo Display Ideas – DIY
If you are not into frames, you can try wall display of your favorite photographs. There are uv flatbed printers that can print your photos in several kinds of materials and in different sizes.

Decorate your living room with this beautiful photograph wreath, it gives a personal touch and warmth to the celebrations. Link

Vintage decorations on mantle or fireplace look classic, you can put old bottles to a good use. Creative and easy on pocket. Link

Hope these photo display ideas will inspire you to get started on putting your best memories out there. Lets Live Impressive!